Internationalization in SvelteKit with sveltekit-i18n
Senior Frontend Dev. Mostly Angular and Svelte. I will be sharing my day-to-day learning experiences here with the community.
This is the second article of three-part series to demonstrate i18n in SvelteKit. In the previous article, we worked our way with svelte-i18n and in this article, we will work on integrating sveltekit-i18n with SvelteKit.
The sveltekit-i18n is a tiny library with no external dependencies, built for Svelte and SvelteKit. Key features include:
SvelteKit ready.
SSR support.
Custom data sources: no matter if you are using local files or remote API to get your translations.
Module-based: your translations are loaded for visited pages only (and only once!)
Component-scoped translations: you can create multiple instances with custom definitions.
Custom modifiers: you can modify the input data the way you need.
TS support.
No external dependencies.
Application Structure
Before we begin, I want to give you a detailed walkthrough of the application that we will be working on. You can find the code in the GitHub repository.
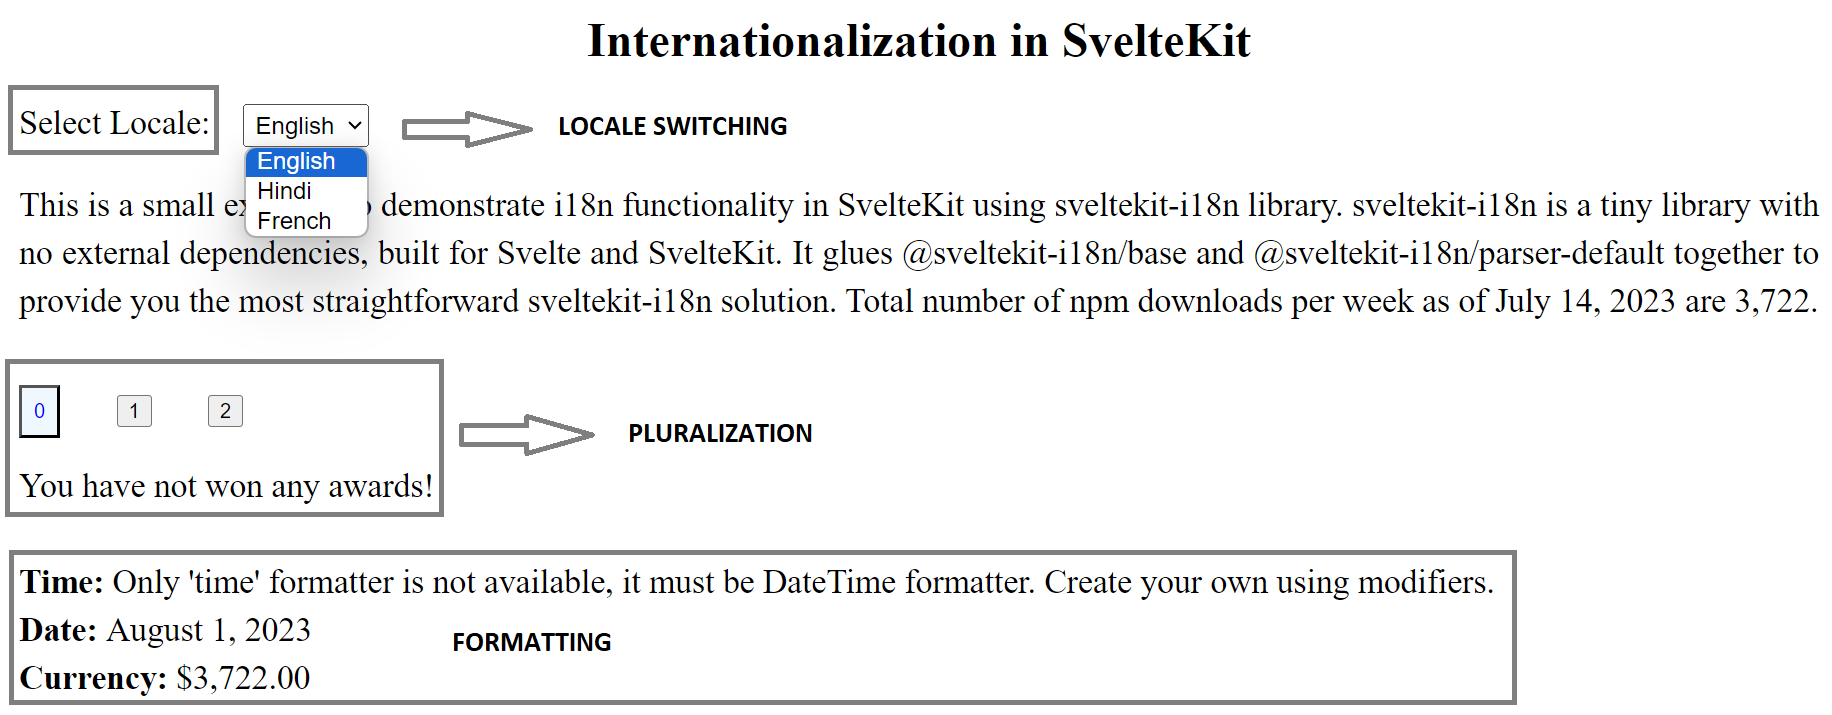
As we can see from the image, this will be a simple single-page application demonstrating i18n features like locale switching, pluralization and formatting.
In the next section, we will work on integrating the sveltekit-i18n library with SvelteKit.
Integration with SvelteKit
Install the sveltekit-i18n library
This first step is to install this library as a dependency in our SvelteKit project:
pnpm i sveltekit-i18n
Define Locale Dictionary
Now that we have installed this library, it's time to identify the areas in our application that need localization. We then define the locale dictionaries within the src/lib/lang folder. A locale dictionary is a regular JSON object which contains message definitions for a certain language.
In our example application, I want five fields to be localized: The main heading, Lable for locale switching, Button label text, Body text (the paragraph) and Text for pluralization.
For the sake of this application, I will define dictionaries in three languages - English (en.json), Hindi (hi.json) and French (fr.json) within the src/lib/lang folder.
  // en.json
  {
    "heading": "Internationalization in SvelteKit",
    "toggle_label": "Select Locale",
    "button_label_0": "{{value:number}}",
    "button_label_1": "{{value:number}}",
    "button_label_2": "{{value:number}}",
    "body_text": "This is a small example to demonstrate i18n functionality in SvelteKit using sveltekit-i18n library. sveltekit-i18n is a tiny library with no external dependencies, built for Svelte and SvelteKit. It glues @sveltekit-i18n/base and @sveltekit-i18n/parser-default together to provide you the most straightforward sveltekit-i18n solution. Total number of npm downloads per week as of {{dateValue:date}} are {{download:number}}.",
    "awards":"You have {{award:gt; 0: {{award; 1:won exactly {{award}} award; default:won {{award}} awards}}; default:not won any awards}}!",
    "date": "{{val:date}}",
    "time": "Only 'time' formatter is not available, it must be DateTime formatter",
    "number": "{{value:currency}}"
  }

  // hi.json
  {
    "heading": "SvelteKit में अंतर्राष्ट्रीयकरण",
    "toggle_label": "भाषा चुने",
    "button_label_0": "{{value:number}}",
    "button_label_1": "{{value:number}}",
    "button_label_2": "{{value:number}}",
    "body_text": "यह sveltekit-i18n लाइब्रेरी का उपयोग करके SvelteKit में i18n कार्यक्षमता प्रदर्शित करने के लिए एक छोटा सा उदाहरण है। sveltekit-i18n एक छोटी लाइब्रेरी है जिसमें कोई बाहरी निर्भरता नहीं है, जो Svelte और SvelteKit के लिए बनाई गई है। यह आपको सबसे सीधा sveltekit-i18n समाधान प्रदान करने के लिए @sveltekit-i18n/base और @sveltekit-i18n/parser-default को एक साथ जोड़ता है। {{dateValue:date}} तक प्रति सप्ताह npm डाउनलोड की कुल संख्या {{download:number}} है|",
    "awards": "आपने {{award:gt; 0: {{award; 1:बिल्कुल {{award}} पुरस्कार जीता; default:{{award}} पुरस्कार जीते }}; default:कोई पुरस्कार नहीं जीता }} है|",
    "date": "{{val:date}}",
    "time": "केवल 'समय' फ़ॉर्मेटर उपलब्ध नहीं है, यह डेटटाइम फ़ॉर्मेटर होना चाहिए",
    "number": "{{value:currency}}"
  }

  // etc... all other languages that you wish to support
Pay attention to the syntax
{{value: <type>}}Let's break this syntax down into two parts:{value}is a placeholder that will be populated with a value of a particular locale during runtime. As the locale changes, this field will be recomputed.{value: <type>}is used to specify the data type of value e.g. number, Date etc.
Defining entry point and mode for initializing the sveltekit-i18n library
Now that our library is installed and the locale dictionary is ready, it is time to create an entry point that will load the assets based on the user locale and initialize the library with a specific locale.
This entry point will be invoked as soon as the application bootstraps - once on the client side and once on the server side.
We will create the helper methods in the src/lib/translations.ts file.
  import i18n, { type Config } from 'sveltekit-i18n';

  const config: Config<> = {
    initLocale: 'en',
    loaders: [
      {
        locale: 'en',
        key: '',
        loader: async () => (await import('./lang/en.json')).default
      },
      {
        locale: 'hi',
        key: '',
        loader: async () => (await import('./lang/hi.json')).default
      },
      {
        locale: 'fr',
        key: '',
        loader: async () => (await import('./lang/fr.json')).default
      }
    ]
  };

  export const { t, loading, locales, locale, initialized, translations, loadTranslations } =
      new i18n(config);
The above code snippet loads the locale files (en.json, hi.json and fr.json) and registers them with the library. Now when the user switches the locale, the corresponding translation file will be used.
We also provide
initLocaleand the translations will be initialized immediately using this locale.The other property is
loaders. You can useloadersto define your asynchronous translation load. Each loader can include:locale: locale (e.g.en,de).key: represents the translation namespace. This key is used as a translation prefix so it should be module-unique. You can access your translation later using$t('key.yourTranslation'). It shouldn't include.(dot) character.loader: is a function returning aPromisewith translation data. You can use it to load files locally or fetch them from your API.
There are other options as well, but for the sake of simplicity, I won't be using them all. You can refer to them in the official documentation.
Finally, we export out few helper properties and methods that will be used throughout our application for localization.
$t: This is a readable store using which you can obtain your translations for a given translation key and interpolation variables. Example:$t('heading')or$t('body_text', { variable: 'value' })$loading: A readable store that indicates whether translations are loading or not.$locales: A readable store, containing all instance locales.$initialized: This readable store returnstrueafter the first translation is successfully initialized.$translations: A readable store, containing all preprocessed translations.loadTranslations(locale: string, route: string): This functions loads the translation based on provided locale and route.
There are other options as well, but for the sake of simplicity, I won't be using them all. You can refer to them in the official documentation.
Load the translations
We load the translations in the +layout.ts file.
  import type { LayoutLoad } from './$types';
  import { browser } from '$app/environment';
  import { loadTranslations } from '$lib/translations';

  export const load: LayoutLoad = async ({ url }) => {
    const { pathname } = url;
    const initLocale = getInitialLocale();

    await loadTranslations(initLocale, pathname);

    return { locale: initLocale, route: pathname };
  };

  function getInitialLocale(): string {
    if (browser) {
      try {
        return window.navigator.language.split('-')[0];
      }
      catch(e) {
        return 'en';
      }
    }

    return 'en';
  }
For the sake of explanation, I am keeping things simple and limiting them to use the default language configured in the user's browser but you can extend this logic to set locale returned by parent layout or by any other means and set it accordingly!
One last step is to update the locale for the requests that are hitting our servers. We need to tell the server what language is being used. The easiest way to set the locale is in the hooks.server.ts file.
  import type { Handle } from '@sveltejs/kit';
  import { locale } from '$lib/translations';

  export const handle: Handle = async ({ event, resolve }) => {
    const lang = event.request.headers.get('accept-language')?.split(',')[0];
    if (lang) {
      locale.set(lang);
    }
    return resolve(event);
  };
In the above example, we intercept every request and look for a header with the key "accept-language" and set it as the current locale.
For the sake of explanation, I am keeping things simple and limiting them to query headers only but you can extend this logic to query cookies and URL parameters to compute the locale and set it accordingly!
Localizing Application
Before we start with localization, it is important to ensure the default locale is set up and that we do have an initial set of key-value message pairs for translations. To do so we can make use of $initialized store.
import { t, initialized } from '$lib/translations';

<div class="content">
  {#if $initialized}
    <h1>{$t('heading')}</h1>
  {:else}
    <div>Locale initializing...</div>
  {/if}
</div>
Now that we have configured the library and have the initial locale set, we're ready to start localizing our app. To do that we simply import $t and pass the message-id in any component that needs to be translated.
<script>
  import { t } from '$lib/translations';
</script>

<h1>{$t('page_title')}</h1>
From the context of our application, let us revisit our translation file:
{
  "heading": "Internationalization in SvelteKit",
  "toggle_label": "Select Locale",
  "button_label_0": "{{value:number}}",
  "button_label_1": "{{value:number}}",
  "button_label_2": "{{value:number}}",
  "body_text": "This is a small example to demonstrate i18n functionality in SvelteKit using sveltekit-i18n library. sveltekit-i18n is a tiny library with no external dependencies, built for Svelte and SvelteKit. It glues @sveltekit-i18n/base and @sveltekit-i18n/parser-default together to provide you the most straightforward sveltekit-i18n solution. Total number of npm downloads per week as of {{dateValue:date}} are {{download:number}}.",
  "awards":"You have {{award:gt; 0: {{award; 1:won exactly {{award}} award; default:won {{award}} awards}}; default:not won any awards}}!",
  "date": "{{val:date}}",
  "time": "Only 'time' formatter is not available, it must be DateTime formatter",
  "number": "{{value:currency}}"
}
To set the main heading, the label for locale switching and the button label text, we simply invoke $t() and pass in the message-id as explained above:
<h1>{$t('heading')}</h1>
<span>{$t('toggle_label')}: </span>
<button>{$t('button_label_0')}</button>
<button>{$t('button_label_1')}</button>
<button>{$t('button_label_2')}</button>
We can also pass additional parameters to $t() and the syntax is:
$t(messageId: string, vars?: Record<any, any>): string
In the message-id, we had something like:
"body_text": "... {{dateValue:date}} are {{download:number}}."
We can use the new syntax that we just saw and fill in the values of the dateValue and the download placeholders ({{ ... }}) dynamically:
<p>{$t('body_text',
  { dateValue: Date.UTC(2023, 6, 14, 0, 0, 0, 0), download: 3722 }
)}</p>
We can extend this snippet to format the Date as well
<p>{$t('body_text',
  { dateValue: Date.UTC(2023, 6, 14, 0, 0, 0, 0), download: 3722 },
  { date: { year: "numeric", month: "long", day: "numeric" }}
)}</p>
Note that ;, :, { and } characters are used as placeholder identifiers and separators, so you shouldn't use them within your definition keys and values. You should use their escaped form instead (\\;, \\:, \\{ or \\}).
Type Safety in Translations using Modifiers
Let's revisit the last example from our translation file and observe the syntax:
"body_text": "... {{dateValue:date}} are {{download:number}}."
The sveltekit-i18n allows us to define the type of value we are expecting at runtime using modifiers.
The Modifiers don't represent the payload value directly, but they can use it for further calculations. The syntax for modifiers is:
{{ placeholder: modifier }}
Example: {{dateValue:date}}, {{download:number}}
The sveltekit-i18n provides multiple inbuild modifiers as well as the flexibility to create custom modifiers. I won't be able to cover all modifiers in this article, so I'll recommend going through official documentation for more examples and use cases.
Locale Switching
To switch between locales, we make use of the $locale store variable. The locale store defines what is the current locale.
<script lang="ts">
  import { locale } from '$lib/translations';

  let value: string = 'en';

  function handleLocaleChange(event: Event) {
    event.preventDefault();
    value = event?.target?.value;
    $locale = value;
  }
</script>

<select {value} on:change={handleLocaleChange}>
  <option value="en" selected>English</option>
  <option value="hi">Hindi</option>
  <option value="fr">French</option>
</select>
We can get the list of locales available in our application using the $locales
<script>
  import { locales } from '$lib/translations';
</script>

{#each $locales as locale, i}
  <option value={locale}>{locale.toUpperCase()}</option>
{/each}
<!-- $locales = ['en', 'hi', 'fr'] -->
Pluralization
Let's start with Pluralization. Consider the following message-id:
"awards":"You have {{award:gt; 0: {{award; 1:won exactly {{award}} award; default:won {{award}} awards}}; default:not won any awards}}!"
The syntax for pluralizing a string in the sveltekit-i18n is as follows:
{{ variable:modifier; 0:{{ variable }} {{ variable; 1: some-message; default: some-message }}; default:some-default-message; }}
While pluralizing a string we make use of modifiers. We compare the input value against the modifier and execute conditions and display the message. If none of the conditions satisfies, we display a default value!
Concerning our application example, consider the following invocation:
<span>{$t('awards', { award: randomNumber })}</span>
In the given example, we make use of gt modifier (input value is greater than the value in your definition). Statement {{ award:gt; ... }} means the input variable award value should be compared and if that is greater than 0, display a specific message else display a default message.
if
award = 1, the modifier will execute the condition within1: some-messageand output will be "You have won exactly 1 award". Here{{award}}specifies the value of the variable.if
award > 1, the modifier will execute the condition withindefault: some-messageand output will be "You have won 5 awards" (assuming award = 5)if
award = 0, since we have usedgtmodifier, it will always execute certain conditions if the value > 0 else will executedefault: some-default-messageand output will be "You have not won any awards". Since we are usinggtmodifier, we can omit the condition post0:i.e.0:{{ ... }}can be0:as it will always be ignored!
Parsers
The Parsers are responsible for interpreting and translating messages. The sveltekit-i18n comes with two parsers: The default parser and the ICU parser.
Until this point in the article, we have been using the default parser. However, we can adapt the ICU parser as well. To do this, we have to first install the dependency of the ICU parser
pnpm i @sveltekit-i18n/parser-icu
We need to make a few changes in the src/lib/translations.ts file
import i18n from 'sveltekit-i18n';
import parser from '@sveltekit-i18n/parser-icu';
import type { Config } from '@sveltekit-i18n/parser-icu';

const config: Config<Partial<Params>> = {
  initLocale: 'en',
  parser: parser(),
  loaders: [ ... ]
}
Let's walk through these changes:
Update import of type
Configfromsveltekit-i18nto@sveltekit-i18n/parser-icuImport parser from
@sveltekit-i18n/parser-icuAdd an instance of the parser within the existing configuration.
That's it now we are ready to use ICU syntax for formatting and pluralization.
NOTE: We can either use the ICU parser or the default parser and cannot mix them!
Formatting
In this section, I will discuss formatting Date and Currency using inbuild modifiers.
The sveltekit-i18n provides inbuild modifiers as well as provisions to create a custom modifier. For the sake of simplicity, I will only be explaining how to use inbuild modifiers. You can refer to this guide on how to create custom modifiers.
The sveltekit-i18n provides the date and currency modifiers that we can use to format data accordingly. The syntax for formatting is:
<p>{ $t('message-id', { variable: value }, { date: { date-format-option } }) }</p>
<p>{ $t('message-id', { variable: value }, { currency: { currency-format-option } }) }</p>
Coming back to our example application, we can now format the date and currency:
// our translation file
{
  ...,
  "date": "{{val:date}}",
  "number": "{{value:currency}}"
}
<div class="container__content__formatter">
  <span><strong>Date: </strong>{$t('date', { val: new Date() }, { date: { year: "numeric", month: "long", day: "numeric" } })}</span>
  <span><strong>Currency: </strong>{$t('number', { value: 3722 }, { currency: { style: "currency", currency: "INR" } })}</span>
</div>
Miscellaneous
The one last thing I want to cover before concluding this article is type binding the translation configuration. If you're following this article you will see typescript errors within $t() in +page.svelte i.e. the file that we have used for localization.
To correct this, we must define all the variables used for translations within the src/lib/translations.ts file. Refer to the en.json translation file, we make use of 5 variables. We can create an interface out of them and pass it to our configuration object:
interface Params {
  dateValue: number;
  value: number;
  download: number;
  award: number;
  val: Date;
}

const config: Config<Partial<Params>> = {
  initLocale: 'en',
  ...
}
Conclusion
Finally, we were able to localize our application using sveltekit-i18n. You can find the code in the GitHub repo and link to the live demo.
This was the second article of three-part series to demonstrate i18n in SvelteKit. In the next article, I'll be explaining i18n in SvelteKit with typesafe-i18n.
References
Multiple working project examples